10/05/2014

Coconut and blackberry jam cake

Helloooo :) I want to share with you this recipe for a fast cake with ingredients you can easily find. I craved for something sweet and pull this together. So here we go:

Ingredients: 

  • 5 eggs 
  • 100 gr flour 
  • 100 gr coconut 
  • one jar of blackberry jam - 250-300gr 
  • 50 gr brown sugar 
  • baking powder
  • lemon juice 

Time : 20 min to prepare + 40 min in the oven 

You start by dividing the egg parts and in a bowl you mix the white parts with sugar till you get a texture that wont' leak out of the bowl. In another bowl you add the yolks, along with flour, coconut and baking powder, previously dissolved in the lemon juice. 


See? it's very easy. Ah, almost forgot to remind about the oven that needs to be pre-heated at 180 degrees C. 


Then you mix everything and lay it in the tray, on a baking paper. Depending on the oven you have, it might take 35-40 min to bake it. When it's done, it looks like this: 


Now it is the moment when you lay a pretty thick layer of blackberry jam on top of the cake and then you put it back in the oven for another 5-10 min. The result looks like this: 


You can cut into pieces when it gets colder, after 30 min or so. I took it to work the next day,  and I can tell you that my colleagues found it delicious :) So bon-appetit :) 


20/04/2014

Easter eggs - Romanian tradition

Happy Easter :) Wish you all a warm relaxing time with your families during these days :)
I want to share with you these tricks for painting eggs in a 100% natural way, without any chemicals.
So if you are fan of eggs and ready to try something new, then, this recipe is for you.
What you will need:
- eggs;
- 1 old and clean pair of stockings;
- thread;
- 3 pieces beetroot;
- onion peel;
- vinegar

To obtain a red color, you need to peel and cut the beetroot, then you boil it for about 45 min in a large pot. At this quantity of beetroot, you can add about 1,5 - 2 l of water, in any case, the more concentrate the liquid, the more intense the color:


In the next phase, you need  to cover the eggs in onion peel and then place them in the stocking, one by one. After each eggs, you can tie it with thread so it doesn't get released during the boiling process.
When you place them in the pot, the liquid should cover them completely:


They should boil for at least 10 min. When they are boiled, you can place them on napkins to absorb the water and to get colder. Then you can remove the onion peel. For a better look, you could use a bit of oil to give them a shining appearance :)
The result looks like this and I hope you like it:


Kiss, kisses, 


26/01/2014

Brownies with almonds

Hellooooo, dears! Long time, no post :P I have been extremely busy, but I decided to share with you this new recipe I have just tried. Since I am a biiiig fan of brownies, I wanted to make own version, hopefully, a healthier one. I really love it served next to a cup of tea or coffee. This time I had it with ice-cream but it' s really up to you how you will enjoy it :)
Soooo, the ingredients you need:

200 grams chocolate ( I prefer the dark one :))
200 grams butter
100 grams flour
3 spoons cacao
100 grams almonds
3 eggs
50 grams sugar
1 teaspoon baking powder


The first step is to set the oven at 180 degrees to allow it to get hot.
Then you need to melt the chocolate with butter, on a lower level of stove:


When you obtain a liquid mixture, you can take it away from fire. In a bowl, you add the melted chocolate, cacao, sugar, the eggs, the almonds, flour and the baking powder. You can stir it till it becomes a dense composition and then you can lay it in the tray, over the baking paper. To have the same level, I arrange it a bit with a spoon. Now it's good to go in the oven for 20-25 minutes. You don't want to overbake it because it won't have that wet texture, characteristic for brownies. 


For the glaze, I choose some candies filled with coconut and other type of dark chocolate, I followed the same procedure, I melted with a bit of butter:  


When the cake was done, I took it out from oven and waited a bit to get it colder. Then I laid the chocolate glaze on top, careful, with the blade of a knife. 
And voila the cake is done: 


 The eating part is up to you. I am a huge lover of chocolate so I had mine with chocolate ice-cream.
Bon appetit :) 


11/11/2013

Cherry & chocolate cake

Hello, my dear ones! These days we all have to accept that winter is coming and is getting colder and darker. But the sunny part of the whole story lays in our own ideas of making our days better and warmer and what better option could be than to spend an afternoon with friends in the comfort of your house. And since the picture wouldn't be complete without something delicious to eat, here is a new recipe for a cake with chocolate and cherries :) If you like this mix, then probably you are intrigued to read further.
The list of the ingredient we need for this cake:

5 eggs
50 gr of chocolate - grated
100 gr flour
4 spoons sugar
2 spoons of butter
for cream: one Dr. Oetker pudding
cherry jam
one can or jar of cherries


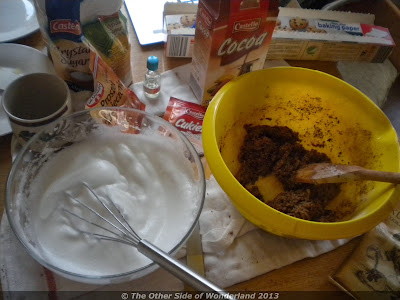
The secret of the cake is to prepare the dough one day before you actually want to serve it. So it goes like this: first you separate the yolk from the white parts and you mix them well till they become a foam. In another bowl, you mix the yolks, flours, butter, chocolate and sugar.


At the end you put everything together, you prepare the tray, meaning you put inside the baking paper, and you put the tray in the over preheated at 170 C.


It should be done in 20-25 minutes, you open the door from the oven gradually, wait for about 5-10 minutes till you can open it completely.
Mine looked like this when it was baked:


When the tray is cold, you could be able to take out the cake and place it in a dry spot, covered by a clean kitchen towel till next day :)
So the work is continued during the next day, as it follows: first you need to gather together all your skills to cut that cake into 2 halves - I know for me it was tricky, but I managed something:


During the next phase I prepared the pudding since I used to cover the whole cake. Here it's nothing difficult, you just need to follow instructions written on package. 


In order not to have a dry cake, you use the juice from the cherry can on whole cake - no worries, it will absorb a lot of liquid and it will have a better taste in the end. Then it's  just a matter of taste how much cherry jam or cherries you put inside, I made it something like this:


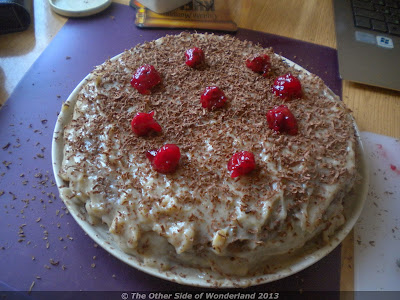
Then I covered it all in pudding and at the very end I decorated with a few cherries & choco :) And it's dooone! But you should leave it in the fridge for 2-3 hours. Then you can serve it with a hot tea or maybe, even better, with a cherry liqueur :))) And of course with your friends. Enjoy it :)


Until next time, kiss, kisses :-*


14/10/2013

Drawing collage

Helloooooo, dears :) I guess long time, no post from my side, but I got back my inspiration and I will post more frequently from now on.
Sooo, my new "creation" is here, a drawing collage that I started it in May so by the time I actually had time to finish it in October, I forgot what inspired me in the first place.
But here it is and I hope you like it and write me comments :)


Different phases of the drawing:


And the final version:


And btw, one of my fav songs this year: 


08/09/2013

Cake for moody days

Hello sweethearts :)
Long time since I posted here ... It has been such a busy period of time: master thesis to write/defend, job and besides a social life to take care about it.
Since the autumn started to squeeze in city and in our lives, I felt like I should indulge more my craving for sweets. Yes, yes, the diet can take a break now. So I came out with this recipe for cake, well, I don't know how much is mine or not. So let's see it :) Ah, and I can assure you it will be delicious because of chocolate and M&M's.

The ingredients you need:
200 grams flour (2 cups)
4 eggs
100 grams chocolate for cooking
50 grams coconut flakes
50 grams M&M's or more :)
50 grams raisins
1/2 cup of sugar
2-3 table spoons butter
2 table spoons cocoa
almond essence/ vanilla sugar
peel from one orange
baking paper
baking powder


First, you start by separating the yolks from the whites in bowl and then you mix well the white parts, till then become a foam. You can also add the sugar while mixing them.Like in the next picture:


You can cut the chocolate into small pieces, size and shape is not that important since it will melt inside.
Then in the other bowl, you mix the yolks with the rest of the sugar, the coconut flakes, the butter, 2-3 drops of essence, vanilla sugar and butter. You can add also the peel of orange and baking powder, but only after you mix it with a bit of lemon juice. Then you can add the flour and mix everything well. Next, you can mix with the white parts, slowly to obtain some sort of a paste. You separate like 1/3 of this mix and add the cacao.


It is the moment to prepare the tray: lay the baking paper inside and set the oven at 180 C degrees to allow it to get hot. Then you can start placing the cake in the tray, in the following manner: one layer of "white" mix, one layer of "brown" mix, the cacao one. Between them you add chocolate, raisins and M&M's. Be careful not to overload the cake with too much chocolate or M&M's since it is likely not to raise anymore. 
When you finish arranging the layers into tray, you can place it in the oven. In my over it was done in appx. 45 minutes, but depends. Don't check the cake in the first 15-20 minutes and don't open the door of the oven. 
When you want to check it, you can use the "stick" method - if the stick gets out clean, it means the cake is done. 
The final version should look like this or even better: 


Hope you enjoy the post and let me know if you try it :) I bet the M&M's will make a good impression among your friends and will bring biiig smiles :)

Kiss, kisses 


27/07/2013

Dandelion dream

Hello my friends :) How is your weekend? Mine is sunny, from all perspectives. Here is my latest "creation" - dandelions and more dandelions. I hope you like it and I am looking forward to reading your comments.
I guess it's the only drawing/painting I have documented with so many photos, mainly because it took me quite a lot of time to get it to this final version. Enjoy and don't forget to let me know your opinions.
Kiss, kisses,


the sketch


in the middle of work, funny pic :)


and the final outcome :) 


some details